
How to Get a Payment Gateway for Your Website in India
How to get a payment gateway for your website in India: KYC documents for your business type, the pages your site needs to pass review and how to connect it.
To get a payment gateway for your website in India, you open an account with a payment aggregator such as Razorpay, Cashfree, PayU or PhonePe, complete its KYC with your PAN, bank account and business documents, and give it a live website to check. Once the account is activated, you connect it to your site with a plugin or the gateway's API and switch from test mode to live payments.
Cashfree says activation usually takes 24 working hours once every document is in. Razorpay's FAQ says its team reviews a KYC submission in 3-4 business days, and final activation depends on its banking partners. The gateway also looks at your website, so a site that isn't live, a business name that doesn't match your documents or a missing refund page can hold up an application that is otherwise complete.
The details below are from the gateways' own help pages: Razorpay's KYC documents by business type, its website details page and FAQ, and Cashfree's account activation guide. Gateways change their forms often, so check the current version before you apply.
The process, step by step
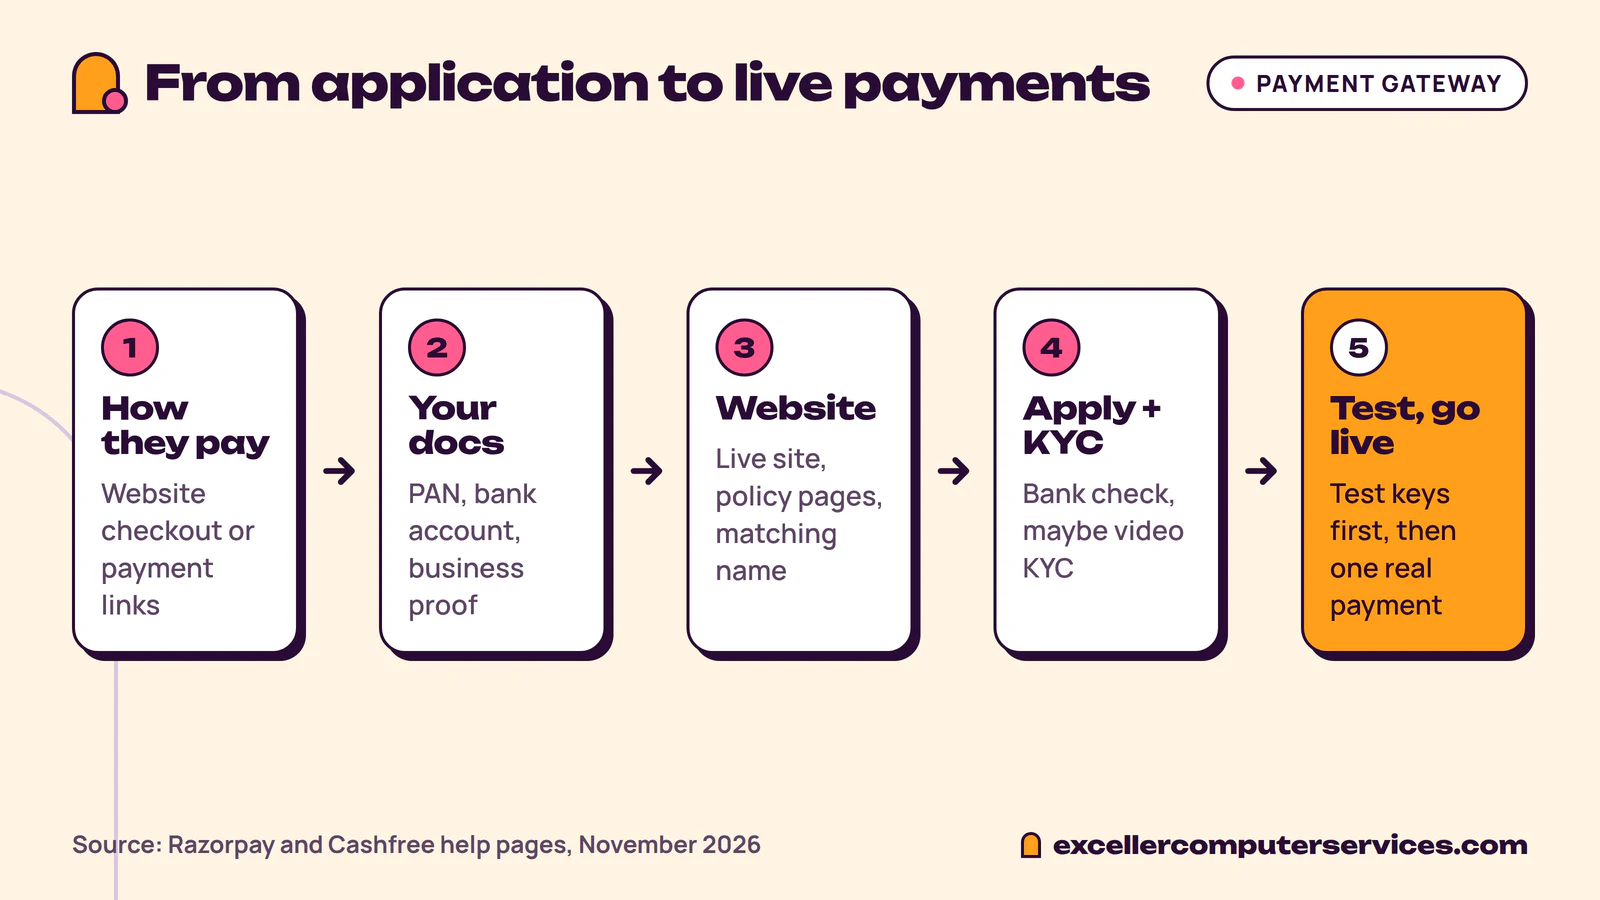
- Decide how customers will pay: a checkout on your website, or payment links you send on WhatsApp or email.
- Collect the KYC documents for your business type.
- Get the website ready for the gateway's checks.
- Apply, verify your bank account and finish KYC.
- Connect the gateway to your site in test mode, then go live.
Do you need a website at all?
Not to start collecting money. Razorpay says that without live website or app details you won't get live API keys, so you can't take payments on a site or app. You can still collect through Invoices and Payment Links made from the Razorpay dashboard. A tutor collecting monthly fees or a caterer taking an advance may need nothing more than a link sent on WhatsApp.
A checkout on your own site makes sense when customers buy without speaking to you first: an online store, course sales, event tickets or bookings. That's when the website checks further down matter.
Documents you need, by business type
What you upload depends on how the business is registered. This is Razorpay's list; Cashfree asks for much the same.
- Individual or unregistered business: PAN and a bank account with IFSC. Razorpay first tries to fetch your identity and address from the CKYC registry, and asks for PAN, Aadhaar or Digilocker only if that fails.
- Sole proprietorship: the owner's PAN and address proof (Aadhaar, voter ID or passport), a bank account, and two business documents from this list: Udyam (MSME) certificate, GST certificate, Shop and Establishment certificate, Import Export Code or a postpaid mobile bill.
- Partnership: business PAN, the partnership deed, the registration certificate if the firm is registered, PAN and Aadhaar of each beneficial owner, and a power of attorney for the person who signs.
- Private limited company: business PAN, certificate of incorporation, MOA and AOA, a board resolution or power of attorney for the signatory, and a declaration naming everyone who holds more than 10% of the shares.
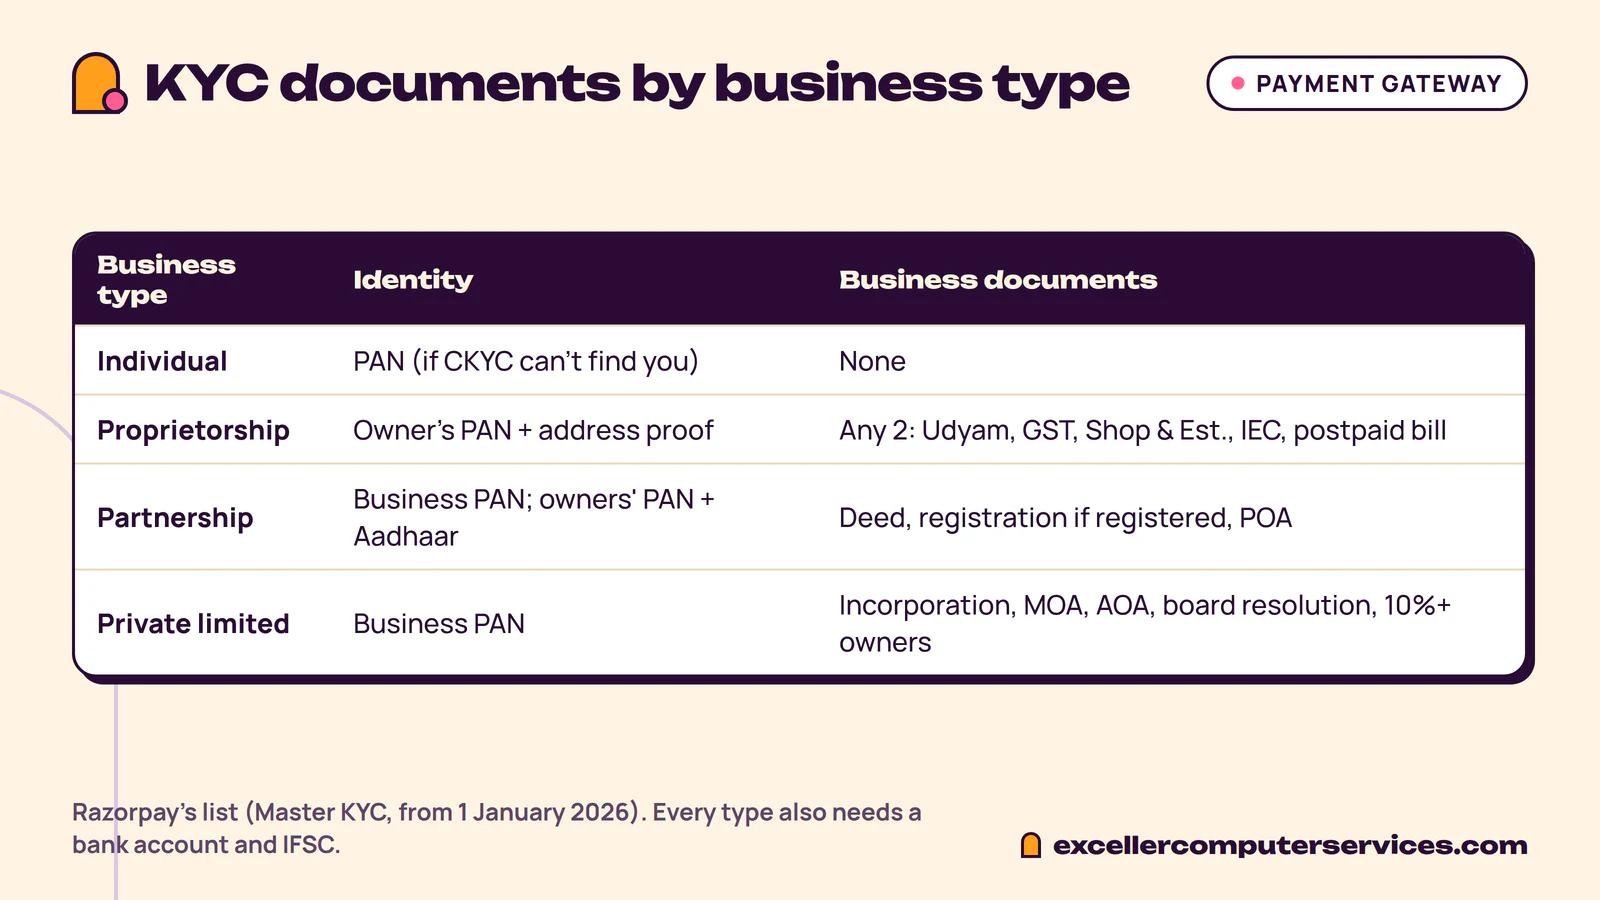
GST registration isn't compulsory for a proprietor on Razorpay's list. It's one of the business documents you can choose. Under the Master KYC rules that apply from 1 January 2026, Razorpay asks proprietors for two of them; before that, a GSTIN alone was enough.
Cashfree wants the bank account in the business owner's name, and Razorpay asks for a video of a cancelled cheque if it can't verify the account. Spell the business name the same way on your PAN, GST certificate, bank account and website footer, because the checks compare them.
What your website needs before you apply
The gateway checks your site to confirm that the business is real and sells what you said it does. Cashfree's automated check compares your legal name and business category with your website or app. Razorpay runs instant checks on the website, its policy pages and your business category when you add your main site, and asks you to link these pages:
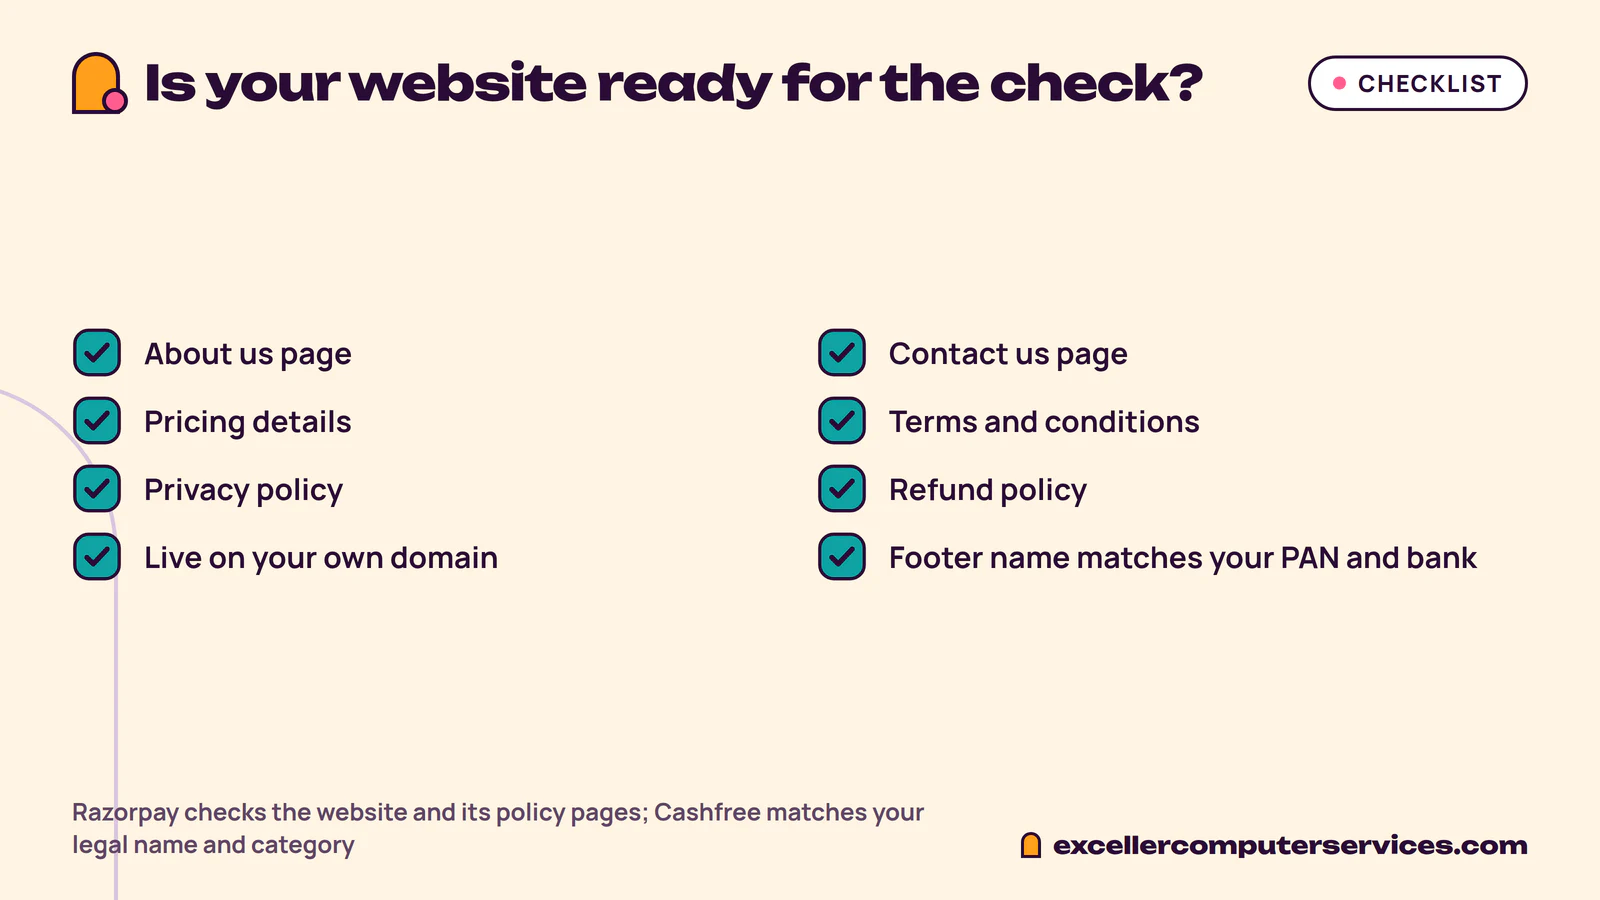
- About us
- Contact us
- Pricing details
- Terms and conditions
- Privacy policy
- Refund policy (or cancellation and refund policy)
Razorpay's sources disagree a little here. Its FAQ says terms, refund and privacy policies are no longer required at onboarding under Master KYC, while its website settings page still checks policy pages when you add a site. Build them anyway. Shoppers look for a refund policy before they pay, and you'll need it the first time someone asks for their money back.
Before you submit, also check that:
- The site is live on your own domain. A "coming soon" page or a staging link won't pass.
- Each product or service is described, with a price or a clear way to ask for one.
- The legal name, address and email in the footer match your KYC documents.
- You have a test login ready if customers must sign in to pay. Razorpay asks for one.
- You have a sample invoice as an image or PDF. Razorpay asks for this too.
When we help a client apply, we go through their website before anything is submitted. We add any missing refund, terms or privacy page and make sure the business name in the footer is spelled exactly as it is on their PAN and bank account.
Applying and finishing KYC
Sign up on the gateway's website with the mobile number and email you'll use for the business. Choose your business type and category, upload the documents and enter the bank account. Then expect some of these:
- Bank verification. The gateway checks the account number and IFSC, and Razorpay may ask for the cancelled-cheque video.
- Video KYC. Razorpay asks for it when the CKYC search finds no record for your business. Cashfree asks only when its enhanced due diligence fails or it needs more documents.
- Approval by banking partners. Razorpay notes that activation is subject to its banking partners, and that its working days leave out weekends and bank holidays.
If the application is rejected, read the reason before you resubmit. Razorpay's FAQ gives one common reason: it doesn't support your business sub-category. Sending the same application again won't change that, so apply to another gateway instead.
Connecting the gateway to your website
How you connect it depends on what your site runs on.
- Shopify: add the gateway in the store's payment settings and sign in with your gateway account.
- WooCommerce: install the gateway's plugin and paste in the API keys from its dashboard.
- A custom website or app: your developer adds the gateway's checkout and sets up webhooks, so an order is marked paid only after the gateway confirms the payment.
Every gateway gives you a test mode with separate test keys. Try a successful UPI payment, a card payment and a failed one, and make sure the order status is right each time. After you switch to live keys, make one small real payment, refund it, and confirm that the settlement reaches your bank account.
Before a store we build goes live, we pay for a real order with UPI, refund it, and check that the order confirmation and invoice went out and the stock count changed.
Which gateway should you choose?
Fees and settlement terms change, so read each gateway's current pricing page before you apply. For most small businesses the differences that matter are whether the gateway accepts your business category, how soon it settles money to your bank, whether it has a plugin for your platform, and how easy its support is to reach. If one gateway turns down your category, another may accept it.
Our e-commerce website development page lists the gateways we set up and how we build checkout. If you don't sell online yet and only need a site with the right pages, start with website design. To get a quote for either, contact us.
Quick answers
Can I get a payment gateway without a website?
You can collect payments without one. Razorpay lets you send Payment Links and Invoices from its dashboard, but it won't give you live API keys for a website or app checkout until you add live website or app details.
Do I need GST registration to get a payment gateway?
Not always. Individuals and unregistered businesses can apply with PAN and a bank account. On Razorpay's list, a sole proprietor needs two business documents, and the GST certificate is one option alongside Udyam, Shop and Establishment, Import Export Code or a postpaid mobile bill.
How long does payment gateway activation take?
Cashfree says activation usually takes 24 working hours after you submit all documents. Razorpay's FAQ says its team reviews a KYC submission in 3-4 business days, and final activation depends on its banking partners.
Why was my payment gateway application rejected?
Read the reason the gateway gives. Razorpay says one reason is that it doesn't support your business sub-category. Other things to check are a website that isn't live, a business name that doesn't match your documents, and missing policy pages.
Want help with this?
Tell us about your business and we will send a free quote.